My “home lab” has been a key part of my career; it has allowed me to learn and experiment with many new technologies. It’s always been a bit all over the place. Based on almost every flavour of virtualisation going around, it’s been offline for months and sometimes gets so patchy that its best just to delete it and start again.
For a long time, I have wanted to build a stable hosting base that allows my home lab tinkering to continue and is also stable enough to run “production” loads for my personal needs. Given that most things these days are now going to containers, and most of the things I run can be in containers, it feels like an excellent place to start, but here’s the problem. I have built many systems over the years to host and serve services for companies, it is now hard programmed into my mindset that things must be done well, have redundancy, and be invisible. This is no different. When you talk about redundancy with containers, the clear leader is Kubernetes, but it can be challenging; it’s a very complex, all-be-it brilliant platform. The fantastic part about Kubernetes, it scales well, both large and small.
Decisions and Challenges
I wanted to cram a lot into this little project.
High Availability - If something dies, I don’t want my entire system to go offline anymore; my gear is second-hand and prone to break. I need to be able to source, configure and reintroduce any failed element back into the platform quickly.
Full IPv6-only connectivity - IPv4 has served us well, but it’s time for it to stand aside. Done right, IPv6 can be much simpler than IPv4; forget about NAT, configure your firewall and off you go.
Hyperconverged - Storage has always been a bigger problem for me than it needs to be. At one stage, I had a dedicated FreeNAS box, but that takes a whole pc and is a single point of failure; I also have a little two-bay Synology NAS that would easily be ten years old. But again a single point of failure. Instead of buying and running more equipment, why not use the same servers already in the cluster? We can make it HA across the nodes with the right technology stack.
Hands off (well, sort of) - I don’t want this to be a significant maintenance burden, worrying about expiring certs and upgrades. It needs to be hands-off and look after itself for the most part.
If you have ever explored Kubernetes, chances are you have found Kelsey Hightower’s Kubernetes The Hard Way guide (https://github.com/kelseyhightower/kubernetes-the-hard-way) It is fantastic and worth a go. I have built it a few times and learned an incredible amount about how K8s works under the hood, but for this setup, I wanted the day-to-day maintenance to be clean and easy. So why do I mention it? If you are planning on building your cluster following this guide, understanding how K8s works are essential; at a bare minimum, I suggest reading through the hard way guide and ensuring you understand the components.
So what are we going to use to build this cluster:
K3s - This is a fantastic option for quickly building a little cluster; it sorts out the certs, binaries, the control plane and even the internal database. It also has IPv6-only support. For me, it was an easy decision to go with K3s. We are going to use only some of K3s, we could use more, but I still want this to be a flexible and powerful cluster, so we will still do several parts ourselves.
Calico - By default, K3s is going to deploy a layer two network Flannel. Flannel is excellent. Still, for this setup, I wanted full BGP; I want to route directly into my service IP to simplify tinkering; it’s a home lab, after all. Importantly BGP fit’s into my broader home lab tinkering world perfectly, allowing me to extend my network quickly, bringing all the HA, optimisation, and other work I have already done.
Rook - Rancher, who makes K3s, also makes a product called Longhorn; It is fantastic and would be an excellent option for storage; however, it doesn’t do IPv6 only at this point, so I had to look elsewhere. Rook running a Ceph cluster is where I have landed. It will allow a storage pool to be built across our three compute nodes that can deliver Persistent Volume claims to our cluster
Traefik Proxy - Finally, we will switch out Nginx for Traefik; this is down to me having used Traefik before; it does IPv6 only, and I know I can get it to do what I need. Nginx would also work here.
So that covers our main cluster technology, K3s manage’s compute, Calico looks after networking, Rook handles our storage, and Traefik will provide a global entry point into our services. But there are a few internal settings that will trip us up. Firstly Github, at the time of writing, does not support IPv6 on the main sites, it is on the githubusercontent site, but the repos don’t support it. We also need to handle docker hub not providing IPv6 on the main url’s. Thankfully they do have IPv6 endpoints, so we can quickly get around this, but it is something that can catch us out once you start deploying things onto the cluster. We will go through how to fix this for docker hub later, but if you start using your cluster and find you are getting image pull errors, check it supports IPv6 on that repository.
Our final little design issue is the lack of global IPv6 takeup; it’s getting there, but it is not perfect. Even where it is available, a lot of the time, the networks we use daily may not have it enabled by default, my brother’s house, for example, could have IPv6, but his ISP, by default, doesn’t configure the router they send out with it (yes I need to fix it for him). We want to ensure the IPv4 world can still reach our services, so how do we do this without compromising the integrity of our IPv6-only requirement? All of my services sit behind Cloudflare; now, full disclosure, I work for them, so it is an easy choice. However, all the features we need are part of the free offerings. The default free CDN offering with DNS will automatically proxy to an IPv6-only backend; we can also use the zero trust product that currently has 50 free users to authenticate into these securely. This guide will talk about setting up Traefik and Let’s Encrypt to generate certificates automatically using Cloudflare; we will also set up a test ingress through Cloudflare. None of it needs to use Cloudflare, and there are references in Traefik’s documentation on how to use other providers.
Discalimer / Warning
This is not a complete guide; it will hopefully set up a fully functioning cluster for you; it is incomplete. Many settings, optimisations, best practices, and security considerations are not covered here.
Network Foundations
Because we are going IPv6 only, we will run into some quirks, but that’s fine; we can work around these. First thing, you need some IPs. A few options here depend on your ISP and how complex you want to get. In summary, we are going to need three allocations:
A range for the nodes to live in, usually a /64
A cluster range for pods to be allocated addresses. It needs to be a /64
A services range where you will be able to expose resources; this will be a /112 and can come from the cluster range
If you happen to get a decent range from your ISP for Prefix Delegation (PD), then you can utilise a subset of that; for example, my ISP at home gives out a /48, so I have a few for my normal VLANs with route adverts and could use some manually.
If you are not that lucky, you will want to look at NAT66; you will be able to utilise the Unique local address range fc00::/7 for the allocations but will need to configure nat66. I have yet to do this, so you need to make Google your friend.
The third option is to get an IP allocation from an LIR; this can be complex and needs more context than just a cluster, so it’s only for some.
For the sake of this guide, I am going to go with option 1, so here is what my IPv6 world likes like
eth0 - My client VLAN, 2001:db8:123:0::/64 (Assigned by PD)
eth1 - The host network, 2001:db8:123:2::/64
eth2 - ISP Uplink, DHCP
The cluster network - 2001:db8:123:3::/64
It’s a little out of scope for this guide, but here is the quick and dirty of enabling IPv6 via DHCP with your ISP; this may vary based on your provider, but hopefully, it is a starting point.
We are saying to VyOS here that on eth2 where my internet plugs in, auto-configure yourself; VyOS, as a result, will go out and get an IP for the router itself. You can see this address on eth2 below.
You can see these IP ranges on the interface of the router. Once we have that, the router will get an allocation from the ISP for Prefix Delegation, and it’s requesting a block with a CIDR of 48; this may vary with your isp, so adjust accordingly. With that range, we will carve it up; eth0 uses route adverts with an id of 0.
For the final part, I have assigned my host network range to eth1; eth1 is where my servers are.
1
2
3
4
5
6
7
8
9
10
11
12
13
14
15
[email protected]:~$ show interfaces
Codes: S - State, L - Link, u - Up, D - Down, A - Admin Down
Interface IP Address S/L Description
--------- ---------- --- -----------
eth0 u/u
2001:db8:123:0:e4c7:dasa:dddd:3015/64
eth1 2001:db8:123:2::1/64 u/u
eth2 u/u ABB Uplink
2001:db8:ffaa:aca:68ba:dasa:dddd:a18a/128
ifb0 - u/u
lo 127.0.0.1/8 u/u
::1/128
So with that in place, ensure you have internet access on IPv6.
tracert -w 20 -6 -d one.one.one.one
Tracing route to one.one.one.one [2606:4700:4700::1001]
over a maximum of 30 hops:
13 ms 2 ms 3 ms 2001:db8:123:0:e4c7:dasa:dddd:3015
2 * * * Request timed out.
3 * * * Request timed out.
4 * * * Request timed out.
514 ms 11 ms 12 ms 2403:5800:1300:140::2
69 ms 10 ms 7 ms 2001:df0:680:6::3
713 ms 10 ms 10 ms 2606:4700:4700::1001
ping one.one.one.one
Pinging one.one.one.one [2606:4700:4700::1111] with 32 bytes of data:
Reply from 2606:4700:4700::1111: time=11ms
Reply from 2606:4700:4700::1111: time=21ms
Reply from 2606:4700:4700::1111: time=21ms
Reply from 2606:4700:4700::1111: time=8ms
Ping statistics for 2606:4700:4700::1111:
Packets: Sent= 4, Received= 4, Lost=0(0% loss),
Approximate round trip times in milli-seconds:
Minimum= 8ms, Maximum= 21ms, Average= 15ms
Perfect; one final thing to consider is your firewall; it most likely is not configured for IPv6. You should do your own research on what the correct settings for you are.
VM (or physical) provisioning
We need three nodes. Here are some basic specs I used for the base cluster:
CPU: 4 Cores
Memory: 8Gig
Storage: 100Gig
OS: Ubuntu 22.04
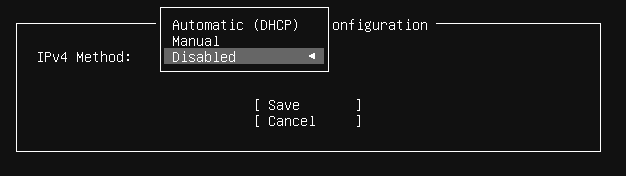
The installation of the OS is basic. We do need to keep an eye on a few things. Networking being the first, we want to disable IPv4 on our interfaces.
Disable IPv4
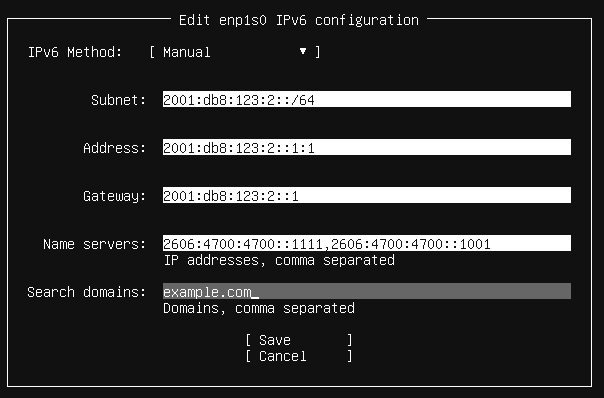
And replace it with IPv6; you will need to change this to match your network; I assign the IP’s so that the last two octets indicate the cluster and node, so in this example, it is cluster 1 node 1. You can assign whatever you want.
Configure IPv6
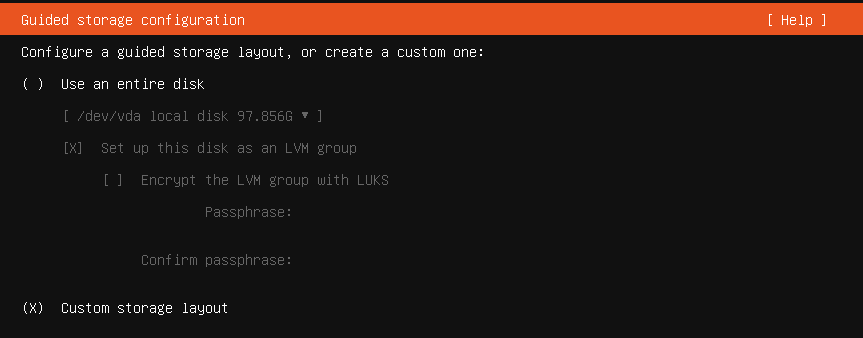
We then want to clear the storage config because we will replace it with our own.
Custom Storage
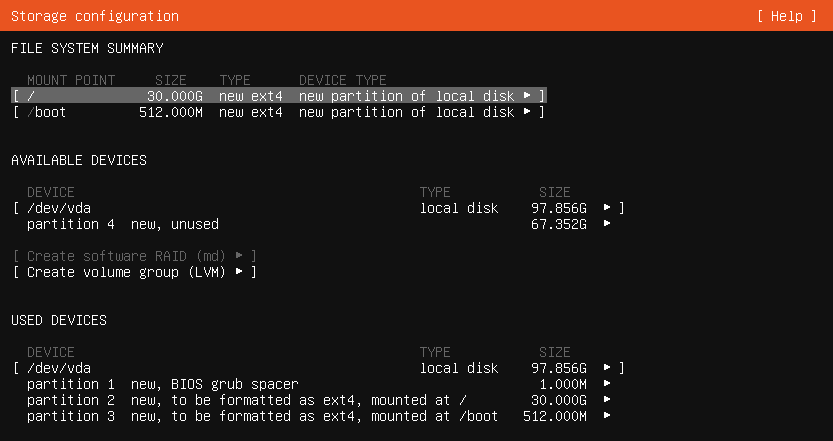
Assign a root partition; mine is 30G and EXT4, and a boot, 512MB, should do. We then want to assign the rest of the disk as an unformatted partition,
Storage Config
Once that’s done, set your hostname and tell it to install SSH services. The most important part is your storage setup; Rook requires a blank raw disk or partition. If it can’t find one, it won’t add it to the cluster. An alternative to how it is done here is to install it as normal and add a second disk.
Once that’s all setup and accessible via SSH, we can move on.
Node Preparation
The nodes now need the same base setup done. So you can repeat these steps for all three.
First up, we will enable IPv6 forwarding; the pod network must be allowed to forward through our main interface, becoming a router. We write this directly to the end of sysctl.conf and reload the rules; we have persistence on reboot but get the changes now. Now for cleanliness, I don’t use route advertisements on these nodes; they’re going to have BGP after all, so I’m turning that off.
By default, there is a chance that we have a bit of a mess going on in the default netplan, so let’s clean that up; we can get unexpected behaviour if we dont have it all nice and clean, especially if we get any extra IP’s on our interfaces. I disable dhcp4 and dhcp6, as well as accept-ra. We also move the gateway to a route command as the gateway entries are deprecated. Here’s the end file.
root@node01:/home/shane# cat /etc/netplan/00-installer-config.yaml
# This is the network config written by 'subiquity'
network:
ethernets:
enp1s0:
dhcp6: no
dhcp4: no
accept-ra: no
link-local: []
addresses:
- 2001:db8:123:2::1:1/64
nameservers:
addresses:
- 2606:4700:4700::1111
- 2606:4700:4700::1001
search:
- example.com
routes:
- to: ::/0
via: 2001:db8:123:2::1
version: 2
It’s time to get some K3s config onto the box. First up is the K3s config. The following file needs to be saved in /etc/rancher/k3s/config.yaml
node-ip: this is the IP you are SSHing into; it’s where all the Kubernetes services will bind.
cluster-domain: this will be the internal domain used for the cluster
cluser-cidr: Calico is going to split this up and assign subblocks to our nodes; these are used for pod IP assignments
service-cidr: we can take this out of the cluster-cidr. It is used to assign our services in the cluster. These will be the primary IPs we access from the rest of the network.
flannel-backend and network policy are being turned off as we are replacing them with Calico
tls-san: these are additional domains it will add to the API certs. If you want to have a DNS name for accessing the API, add it here
disable: finally, we disable traefik, a big part of the cluster, and I find it easy to manage myself. So we will disable it now and configure it ourselves later.
Now we have started to have to deal with the beautiful world of IPv6 issues. Easy one first, docker.io. Docker does not support IPv6 on their main URLs. However, they do have a v6 endpoint, so we can quickly tell k8s to use that; it’s worth double checking we still need this, and that’s easy enough.
And then there is GitHub, we need one file from GitHub that is rather critical, but there is no IPv6 access.
Start by downloading the K3s binary on a pc with access to the cluster and IPv4 Internet. Visit https://github.com/k3s-io/k3s/releases/ and find the link for the latest K3s package. We don’t need airgap, just the binary, because we can do the rest online. Then upload it to each node
So we should be all set to install K3s now. Let’s start with node1. We will use the K3s install script but pass some extra parameters. Working on node1 we can begin to bring the cluster up.
1
2
3
4
5
6
7
8
9
10
11
12
13
14
root@node1:/home/shane# curl -sfL https://get.k3s.io | INSTALL_K3S_SKIP_DOWNLOAD=true K3S_TOKEN=shhhhimasecret sh -s - server --cluster-init
[INFO] Skipping k3s download and verify
[INFO] Skipping installation of SELinux RPM
[INFO] Creating /usr/local/bin/kubectl symlink to k3s
[INFO] Creating /usr/local/bin/crictl symlink to k3s
[INFO] Creating /usr/local/bin/ctr symlink to k3s
[INFO] Creating killall script /usr/local/bin/k3s-killall.sh
[INFO] Creating uninstall script /usr/local/bin/k3s-uninstall.sh
[INFO] env: Creating environment file /etc/systemd/system/k3s.service.env
[INFO] systemd: Creating service file /etc/systemd/system/k3s.service
[INFO] systemd: Enabling k3s unit
Created symlink /etc/systemd/system/multi-user.target.wants/k3s.service → /etc/systemd/system/k3s.service.
[INFO] systemd: Starting k3s
root@node1:/home/shane#
So we are telling it to skip the download; it comes from GitHub, which is why we did it above; otherwise, it would fail. We then give it a secret, which is used for the others to join (please change it), and finally, we tell it to run the script with the install server parameter and init a new cluster.
We should now see it starting. However, if we look at our node and pods, we will see its stuck
root@node1:/home/shane# systemctl status k3s
root@node1:/home/shane# systemctl status k3s
● k3s.service - Lightweight Kubernetes
Loaded: loaded (/etc/systemd/system/k3s.service; enabled; vendor preset: enabled)
Active: active (running) since Sun 2022-12-04 00:47:28 UTC; 831ms ago
Docs: https://k3s.io
Process: 30612 ExecStartPre=/bin/sh -xc ! /usr/bin/systemctl is-enabled --quiet nm-cloud-setup.service (code=exited, status=0/SUCCESS)
Process: 30614 ExecStartPre=/sbin/modprobe br_netfilter (code=exited, status=0/SUCCESS)
Process: 30615 ExecStartPre=/sbin/modprobe overlay (code=exited, status=0/SUCCESS)
Main PID: 30616 (k3s-server)
Tasks: 35
Memory: 489.3M
CPU: 17.889s
CGroup: /system.slice/k3s.service
├─30616 "/usr/local/bin/k3s server" "" "" "" "" "" "" "" "" "" "" "" "" "" "" ""
└─30633 containerd -c /var/lib/rancher/k3s/agent/etc/containerd/config.toml -a /run/k3s/containerd/containerd.sock --state /run/k3s/containerd --root /var/lib/rancher/k3s/agent/contain>
Dec 04 00:47:29 node1 k3s[30616]: I1204 00:47:29.196506 30616 leaderelection.go:258] successfully acquired lease kube-system/kube-controller-manager
Dec 04 00:47:29 node1 k3s[30616]: I1204 00:47:29.197092 30616 event.go:294] "Event occurred" object="kube-system/kube-controller-manager" fieldPath="" kind="Lease" apiVersion="coordination.k8s.io>
Dec 04 00:47:29 node1 k3s[30616]: I1204 00:47:29.220797 30616 shared_informer.go:255] Waiting for caches to sync for tokens
Dec 04 00:47:29 node1 k3s[30616]: I1204 00:47:29.256088 30616 controller.go:616] quota admission added evaluator for: serviceaccounts
Dec 04 00:47:29 node1 k3s[30616]: I1204 00:47:29.257529 30616 controllermanager.go:603] Started "replicationcontroller"
Dec 04 00:47:29 node1 k3s[30616]: I1204 00:47:29.257677 30616 replica_set.go:205] Starting replicationcontroller controller
Dec 04 00:47:29 node1 k3s[30616]: I1204 00:47:29.257687 30616 shared_informer.go:255] Waiting for caches to sync for ReplicationController
Dec 04 00:47:29 node1 k3s[30616]: I1204 00:47:29.260804 30616 shared_informer.go:262] Caches are synced for client-ca::kube-system::extension-apiserver-authentication::requestheader-client-ca-file
Dec 04 00:47:29 node1 k3s[30616]: I1204 00:47:29.260855 30616 shared_informer.go:262] Caches are synced for RequestHeaderAuthRequestController
Dec 04 00:47:29 node1 k3s[30616]: I1204 00:47:29.260910 30616 shared_informer.go:262] Caches are synced for client-ca::kube-system::extension-apiserver-authentication::client-ca-file
root@node1:/home/shane# kubectl get nodes
NAME STATUS ROLES AGE VERSION
node1 Ready control-plane,etcd,master 20s v1.25.4+k3s1
root@node1:/home/shane# kubectl get pods --all-namespaces
NAMESPACE NAME READY STATUS RESTARTS AGE
kube-system coredns-597584b69b-29jns 0/1 ContainerCreating 0 25s
kube-system local-path-provisioner-79f67d76f8-rdwz9 0/1 ContainerCreating 0 25s
kube-system metrics-server-5c8978b444-wsxf2 0/1 ContainerCreating 0 25s
Everything is just sitting creating, and the reason for this is we don’t yet have our CNI, so let’s set up Calico. We first need the operator; you can do this from the node; githubusercontent has IPv6
root@node1:/home/shane# kubectl create -f https://raw.githubusercontent.com/projectcalico/calico/v3.24.5/manifests/tigera-operator.yaml
namespace/tigera-operator created
customresourcedefinition.apiextensions.k8s.io/bgpconfigurations.crd.projectcalico.org created
customresourcedefinition.apiextensions.k8s.io/bgppeers.crd.projectcalico.org created
customresourcedefinition.apiextensions.k8s.io/blockaffinities.crd.projectcalico.org created
customresourcedefinition.apiextensions.k8s.io/caliconodestatuses.crd.projectcalico.org created
customresourcedefinition.apiextensions.k8s.io/clusterinformations.crd.projectcalico.org created
customresourcedefinition.apiextensions.k8s.io/felixconfigurations.crd.projectcalico.org created
customresourcedefinition.apiextensions.k8s.io/globalnetworkpolicies.crd.projectcalico.org created
customresourcedefinition.apiextensions.k8s.io/globalnetworksets.crd.projectcalico.org created
customresourcedefinition.apiextensions.k8s.io/hostendpoints.crd.projectcalico.org created
customresourcedefinition.apiextensions.k8s.io/ipamblocks.crd.projectcalico.org created
customresourcedefinition.apiextensions.k8s.io/ipamconfigs.crd.projectcalico.org created
customresourcedefinition.apiextensions.k8s.io/ipamhandles.crd.projectcalico.org created
customresourcedefinition.apiextensions.k8s.io/ippools.crd.projectcalico.org created
customresourcedefinition.apiextensions.k8s.io/ipreservations.crd.projectcalico.org created
customresourcedefinition.apiextensions.k8s.io/kubecontrollersconfigurations.crd.projectcalico.org created
customresourcedefinition.apiextensions.k8s.io/networkpolicies.crd.projectcalico.org created
customresourcedefinition.apiextensions.k8s.io/networksets.crd.projectcalico.org created
customresourcedefinition.apiextensions.k8s.io/apiservers.operator.tigera.io created
customresourcedefinition.apiextensions.k8s.io/imagesets.operator.tigera.io created
customresourcedefinition.apiextensions.k8s.io/installations.operator.tigera.io created
customresourcedefinition.apiextensions.k8s.io/tigerastatuses.operator.tigera.io created
serviceaccount/tigera-operator created
clusterrole.rbac.authorization.k8s.io/tigera-operator created
clusterrolebinding.rbac.authorization.k8s.io/tigera-operator created
deployment.apps/tigera-operator created
If we have another look at the pods, we should see tigera-operator creating and eventually running.
1
2
3
4
5
6
7
root@node1:/home/shane# kubectl get pods --all-namespaces
NAMESPACE NAME READY STATUS RESTARTS AGE
kube-system coredns-597584b69b-29jns 0/1 ContainerCreating 0 2m7s
kube-system local-path-provisioner-79f67d76f8-rdwz9 0/1 ContainerCreating 0 2m7s
kube-system metrics-server-5c8978b444-wsxf2 0/1 ContainerCreating 0 2m7s
tigera-operator tigera-operator-6bb5985474-qlgkr 1/1 Running 0 16s
root@node1:/home/shane#
If you are wondering why it’s working and not the others, it’s not on the CNI network; it is bound directly to the host; we can expand our output to see this.
This will define the Calico network and give it the information it needs to start building up the network. You will find our cluster-cidr from before listed above, Calico manages the IPs in the cluster, so it needs to know the details. We are telling it here to take our cluster-cidr, split it up into smaller /122 allocations and hand it out to nodes. The nodes can then use these to give pods IPs.
The second command configures the Calico API server. This is needed for the CRD’s if it is not done you will not be able to configure the rest of Calico later.
We can see things happening now, and after a short wait, we have the calico operators built; again they are assigned to the host, but we also now have our kube-system pods running! Note how they have all been given an IP in our cluster-cidr.
Awesome!
So let’s add our other nodes; on node2 and node3 we need to run the K3s setup but in join mode.
1
2
3
4
5
6
7
8
9
10
11
12
13
14
root@node2:/home/shane# curl -sfL https://get.k3s.io |INSTALL_K3S_SKIP_DOWNLOAD=true K3S_TOKEN=shhhhimasecret sh -s - server --server https://[2001:db8:123:2::1:1]:6443
[INFO] Skipping k3s download and verify
[INFO] Skipping installation of SELinux RPM
[INFO] Creating /usr/local/bin/kubectl symlink to k3s
[INFO] Creating /usr/local/bin/crictl symlink to k3s
[INFO] Creating /usr/local/bin/ctr symlink to k3s
[INFO] Creating killall script /usr/local/bin/k3s-killall.sh
[INFO] Creating uninstall script /usr/local/bin/k3s-uninstall.sh
[INFO] env: Creating environment file /etc/systemd/system/k3s.service.env
[INFO] systemd: Creating service file /etc/systemd/system/k3s.service
[INFO] systemd: Enabling k3s unit
Created symlink /etc/systemd/system/multi-user.target.wants/k3s.service → /etc/systemd/system/k3s.service.
[INFO] systemd: Starting k3s
root@node3:/home/shane#
Back on node1, let’s see what’s happening.
1
2
3
4
5
root@node1:/home/shane# kubectl get nodes
NAME STATUS ROLES AGE VERSION
node1 Ready control-plane,etcd,master 22m v1.25.4+k3s1
node2 Ready control-plane,etcd,master 15s v1.25.4+k3s1
node3 Ready control-plane,etcd,master 3m47s v1.25.4+k3s1
Our nodes are all showing, and we can see Calico spreading out on them.
Our foundations are ready, Kubernetes has its etcd database, control plane and API servers, and we have added our compute nodes, all talking together over calico. Next up, storage!
Once installed, you need to copy the config file of one of the nodes.
1
2
3
4
5
6
7
# Move it to a file your ssh user can access
root@node1:/home/shane# cp /etc/rancher/k3s/k3s.yaml /tmp/k3s.yaml
root@node1: chown shane:shane /tmp/k3s.yaml
# Copy it to your pc
PS C:\Users\shane> scp [2001:db8:123:2::1:3]:/tmp/k3s.yml .kube/config
k3s.yml 100% 2957 577.8KB/s 00:00
PS C:\Users\shane>
The destination on your local pc is the .kube/config file in your homedir. on linux this is ~/.kube/config. you then need to edit this file and replace
1
server: https://[::1]:6443
With one of the node IPs
1
server: https://[2001:db8:123:2::1:1]:6443
From your pc, you should then be able to query the cluster.
1
2
3
4
5
6
PS C:\Users\shane\.kube> kubectl get nodes
NAME STATUS ROLES AGE VERSION
node1 Ready control-plane,etcd,master 46m v1.25.4+k3s1
node2 Ready control-plane,etcd,master 24m v1.25.4+k3s1
node3 Ready control-plane,etcd,master 27m v1.25.4+k3s1
PS C:\Users\shane\.kube>
Also, check helm is working.
1
2
3
PS C:\Users\shane\.kube> helm list
NAME NAMESPACE REVISION UPDATED STATUS CHART APP VERSION
PS C:\Users\shane\.kube>
Adding Persistence
We now have a cluster, and we can deploy persistent storage with the built-in k3s operator, but that will only make the volume available on the node it’s created on, which is not ideal. Instead, we are going to deploy Rook (https://rook.io/). It has two charts for this; one is the operators, then the actual cluster, it’s split like this in case you want more than one cluster. For the operator, we can use the defaults, so installation is straightforward.
PS C:\Users\shane\.kube> helm repo add rook-release https://charts.rook.io/release
PS C:\Users\shane\.kube> helm install --create-namespace --namespace rook-ceph rook-ceph rook-release/rook-ceph
NAME: rook-ceph
LAST DEPLOYED: Sun Dec 4 13:05:52 2022
NAMESPACE: rook-ceph
STATUS: deployed
REVISION: 1
TEST SUITE: None
NOTES:
The Rook Operator has been installed. Check its status by running:
kubectl --namespace rook-ceph get pods -l "app=rook-ceph-operator"
Visit https://rook.io/docs/rook/latest for instructions on how to create and configure Rook clusters
Important Notes:
- You must customize the 'CephCluster' resource in the sample manifests for your cluster.
- Each CephCluster must be deployed to its own namespace, the samples use `rook-ceph` for the namespace.
- The sample manifests assume you also installed the rook-ceph operator in the `rook-ceph` namespace.
- The helm chart includes all the RBAC required to create a CephCluster CRD in the same namespace.
- Any disk devices you add to the cluster in the 'CephCluster' must be empty (no filesystem and no partitions).
Let’s make sure that’s all good before moving on.
1
2
3
4
PS C:\Users\shane\.kube> kubectl --namespace rook-ceph get pods -l "app=rook-ceph-operator" -o wide
NAME READY STATUS RESTARTS AGE IP NODE NOMINATED NODE READINESS GATES
rook-ceph-operator-6db468c48f-kscp9 1/1 Running 0 2m33s 2001:db8:123:3:7bf3:bb28:910a:8700 node3 <none> <none>
PS C:\Users\shane\.kube>
We can now build the actual cluster; we do want to change a few things here for our IPv6 world. So let’s create a values file for it. Save the following as values.yml
 1
 2
 3
 4
 5
 6
 7
 8
 9
10
11
12
13
14
15
toolbox:
enabled: true
cephClusterSpec:
# enable the ceph dashboard for viewing cluster status
dashboard:
enabled: true
urlPrefix: /dashboard
port: 8443
SSL: true
network:
selectors:
ipFamily: "IPv6"
# Ceph daemons to listen on both IPv4 and Ipv6 networks
dualStack: false
PS C:\Users\shane> kubectl -n rook-ceph exec -it deploy/rook-ceph-tools -- /bin/bash
[rook@rook-ceph-tools-b8586f87b-5xkgv /]$ ceph status
cluster:
id: 7e1fa97e-97ed-4b73-86e9-2489aec79f22
health: HEALTH_WARN
too many PGs per OSD (337 > max 250)
services:
mon: 3 daemons, quorum a,b,c (age 12m)
mgr: a(active, since 62m), standbys: b
mds: 1/1 daemons up
osd: 3 osds: 3 up (since 8m), 3 in (since 96m)
rgw: 1 daemon active (1 hosts, 1 zones)
data:
volumes: 1/1 healthy
pools: 12 pools, 337 pgs
objects: 409 objects, 483 KiB
usage: 51 MiB used, 202 GiB / 202 GiB avail
pgs: 337 active+clean
io:
client: 1.9 KiB/s rd, 426 B/s wr, 1 op/s rd, 1 op/s wr
[rook@rook-ceph-tools-b8586f87b-5xkgv /]$
Now, there is a warning, too many PGs per OSD; this is mainly because we only have three nodes in our test setup; I have yet to look into tuning this. The cluster operates perfectly fine. Otherwise, we now have a fully functioning hyper-converged Kubernetes cluster!
Talking to the outside.
Until now, we have only needed the cluster to talk within itself or have the nodes connect via the host networks. However, communication from our pod network is currently restricted to within the cluster. When we set up Calico earlier, we told it the IP CIDRs for the cluster and services, and by default, it sets up a BGP mesh between the nodes and sends routes to them. We now want to have it also talk to our main router and the wider internet.
We could set up static routes pointing back at our nodes for this, but BGP is much more efficient and dynamic. One problem with statics for this is that if a node fails, we need to update them. Also, the nodes use pools for the IPs, so we either need to set up routes for each pool or send them all over to one node and have them forward the traffic for us. It’s yucky; BGP is easy enough. On our router, we need to set up a neighbor for each node. The config snippets that follow are for VyOS; they can be adapted to other platforms, there is nothing VyOS specific here.
1
2
3
4
5
6
7
8
9
10
set protocols bgp system-as '64513'
set protocols bgp peer-group k8s remote-as 64512
set protocols bgp peer-group k8s address-family ipv6-unicast default-originate
set protocols bgp address-family ipv6-unicast network 2001:db8:123:2::/64
set protocols bgp neighbor 2001:db8:123:2::1:1 description 'node1'
set protocols bgp neighbor 2001:db8:123:2::1:1 peer-group k8s
set protocols bgp neighbor 2001:db8:123:2::1:2 description 'node2'
set protocols bgp neighbor 2001:db8:123:2::1:2 peer-group k8s
set protocols bgp neighbor 2001:db8:123:2::1:3 description 'node3'
set protocols bgp neighbor 2001:db8:123:2::1:3 peer-group k8s
So we are setting our router BGP to 64513, Calico, by default, uses 64512, so we will connect on that. As a good practice, we should apply a filter to ensure we only get and send the proper routes. We accept the cluster range down to a /122 and the service range from the cluster; this will make sense later. We also allow a default to go out to the cluster, so it knows where the internet is.
 1
 2
 3
 4
 5
 6
 7
 8
 9
10
11
12
13
14
15
set policy prefix-list6 v6-K8S-IN rule 10 action 'permit'
set policy prefix-list6 v6-K8S-IN rule 10 le '122'
set policy prefix-list6 v6-K8S-IN rule 10 prefix '2001:db8:123:2::/64'
set policy prefix-list6 v6-K8S-IN rule 20 action 'permit'
set policy prefix-list6 v6-K8S-IN rule 20 prefix '2001:db8:123:2:ff00::/112'
set policy prefix-list6 v6-K8S-OUT rule 10 action 'permit'
set policy prefix-list6 v6-K8S-OUT rule 10 prefix '::/0'
set policy route-map v6-K8S-IN rule 10 action 'permit'
set policy route-map v6-K8S-IN rule 10 match ipv6 address prefix-list 'v6-K8S-IN'
set policy route-map v6-K8S-IN rule 20 action 'deny'
set policy route-map v6-K8S-OUT rule 10 action 'permit'
set policy route-map v6-K8S-OUT rule 10 match ipv6 address prefix-list 'v6-K8S-OUT'
set policy route-map v6-K8S-OUT rule 20 action 'deny'
set protocols bgp peer-group k8s address-family ipv6-unicast route-map export 'v6-K8S-OUT'
set protocols bgp peer-group k8s address-family ipv6-unicast route-map import 'v6-K8S-IN'
So we should have some idle BGP sessions and an interface with a IP address in their range.
 1
 2
 3
 4
 5
 6
 7
 8
 9
10
11
12
13
14
15
shane@rtr01:~$ show bgp summary
IPv6 Unicast Summary (VRF default):
BGP router identifier 159.196.236.197, local AS number 64513 vrf-id 0
BGP table version 1
RIB entries 1, using 192 bytes of memory
Peers 3, using 2172 KiB of memory
Peer groups 1, using 64 bytes of memory
Neighbor V AS MsgRcvd MsgSent TblVer InQ OutQ Up/Down State/PfxRcd PfxSnt Desc
2001:db8:123:2::1:1 4 64512 0 0 0 0 0 never Active 0 node1
2001:db8:123:2::1:2 4 64512 0 0 0 0 0 never Active 0 node2
2001:db8:123:2::1:3 4 64512 0 0 0 0 0 never Active 0 node3
Total number of neighbors 3
Calico config is very basic, we only need to define one global peer, and it will form the relationships.
1
2
3
4
5
6
7
8
9
10
11
12
13
root@node1:/home/shane# kubectl create -f - <<EOF
apiVersion: projectcalico.org/v3
kind: BGPPeer
metadata:
name: rtr01
spec:
peerIP: 2001:db8:123:2::1
asNumber: 64513
EOF
root@node1:/home/shane# kubectl get bgppeer
NAME CREATED AT
rtr01 2022-12-04T05:54:11Z
root@node1:/home/shane#
If we go back to the router, we should see sessions established and routes coming in.
shane@rtr01:~$ show bgp summary
IPv6 Unicast Summary (VRF default):
BGP router identifier 159.196.236.197, local AS number 64513 vrf-id 0
BGP table version 4
RIB entries 7, using 1344 bytes of memory
Peers 3, using 2172 KiB of memory
Peer groups 1, using 64 bytes of memory
Neighbor V AS MsgRcvd MsgSent TblVer InQ OutQ Up/Down State/PfxRcd PfxSnt Desc
2001:db8:123:2::1:1 4 64512 28 27 0 0 0 00:04:04 3 1 node1
2001:db8:123:2::1:2 4 64512 28 26 0 0 0 00:04:04 3 1 node2
2001:db8:123:2::1:3 4 64512 28 28 0 0 0 00:04:04 3 1 node3
shane@rtr01:~$ show bgp neighbors 2001:db8:123:2::1:1 routes
BGP table version is 4, local router ID is 159.196.236.197, vrf id 0
Default local pref 100, local AS 64513
Status codes: s suppressed, d damped, h history, * valid, > best, = multipath,
i internal, r RIB-failure, S Stale, R Removed
Nexthop codes: @NNN nexthop's vrf id, < announce-nh-self
Origin codes: i - IGP, e - EGP, ? - incomplete
RPKI validation codes: V valid, I invalid, N Not found
Network Next Hop Metric LocPrf Weight Path
*= 2001:db8:123:3:c11:b42f:f17e:a680/122
2001:db8:123:2::1:1
0 64512 i
*= 2001:db8:123:3:7bf3:bb28:910a:8700/122
2001:db8:123:2::1:1
0 64512 i
*= 2001:db8:123:3:d460:b250:45:b00/122
2001:db8:123:2::1:1
0 64512 i
We have our three bgp sessions up, and we are receiving the prefixes for the pods from each. We are running in the default full mesh mode, so we see all prefixes coming from all nodes, except for our service range. To get the service range, we need to tell Calico to advertise it.
Checking back on the router, we can now see the route coming through
1
2
3
4
5
6
7
shane@rtr01:~$ show ipv6 route 2001:db8:123:3:ff00::/112
Routing entry for 2001:db8:123:3:ff00::/112
Known via "bgp", distance 20, metric 0, best
Last update 00:00:35 ago
* 2001:db8:123:2::1:1, via eth0, weight 1
* 2001:db8:123:2::1:2, via eth0, weight 1
* 2001:db8:123:2::1:3, via eth0, weight 1```
We can give this a quick test by asking the DNS server for the IP of the metrics service from outside the cluster
So we have IP connectivity, but we need something more useful to expose services, there are many options for this, but we will push out Traefik proxy. Given we also have persistent storage, we may as well get Traefik to generate and store certificates for us; I am going to use Cloudflare to enable this; if your domain is hosted with them, it is the easiest. You can see the other options and instructions for different providers on the Traefik site https://doc.traefik.io/traefik/https/acme/
The first step is to get an API token from the Cloudflare portal and generate an API token
Click on your profile in the top right and select My Profile
Select API tokens from the menu, then “Create Token”
You can use the template “Edit DNS”, then specify the zone or zones it can generate from
Follow the prompts to finish it off.
Once you have the token, we can add it as a secret to the cluster
We are overwriting certain parts of the Traefik helm file; we want to define the persistence claim and build it on ceph. Then we configure the certResolver via Cloudflare; the final part is setting environment variables that take the token from the secret and present it to the Traefik instance so the certs can be generated. Now we just apply the config.
1
2
3
4
5
6
7
8
9
10
11
PS C:\Users\shane> helm repo add traefik https://traefik.github.io/charts
PS C:\Users\shane> helm install -f traefik.yml --namespace=traefik traefik traefik/traefik
NAME: traefik
LAST DEPLOYED: Sun Dec 4 20:52:36 2022
NAMESPACE: traefik
STATUS: deployed
REVISION: 1
TEST SUITE: None
NOTES:
Traefik Proxy v2.9.5 has been deployed successfully
on traefik namespace !
We will see our pod create and our services come up
1
2
3
4
5
6
7
PS C:\Users\shane> kubectl get pods -n traefik
NAME READY STATUS RESTARTS AGE
traefik-5c8866d6c4-zt2zx 1/1 Running 0 111s
PS C:\Users\shane> kubectl get services -n traefik
NAME TYPE CLUSTER-IP EXTERNAL-IP PORT(S) AGE
traefik LoadBalancer 2001:db8:123:3:ff00::8893 2001:db8:123:2::1:1,2001:db8:123:2::1:2,2001:db8:123:2::1:3 80:31655/TCP,443:30953/TCP 2m8s
PS C:\Users\shane>
If we visit the service IP, we should get an HTTP and HTTPS response back
 1
 2
 3
 4
 5
 6
 7
 8
 9
10
11
12
13
14
15
16
PS C:\Users\shane> curl [2001:db8:123:3:ff00::8893]
curl : 404 page not found
At line:1 char:1
+ curl [2001:db8:123:3:ff00::8893]
+ ~~~~~~~~~~~~~~~~~~~~~~~~~~~~~~~~~
    + CategoryInfo          : InvalidOperation: (System.Net.HttpWebRequest:HttpWebRequest) [Invoke-WebRequest], WebException
    + FullyQualifiedErrorId : WebCmdletWebResponseException,Microsoft.PowerShell.Commands.InvokeWebRequestCommand
PS C:\Users\shane> curl https://[2001:db8:123:3:ff00::8893]
curl : The underlying connection was closed: Could not establish trust relationship for the SSL/TLS secure channel.
At line:1 char:1
+ curl https://[2001:db8:123:3:ff00::8893]
+ ~~~~~~~~~~~~~~~~~~~~~~~~~~~~~~~~~~~~~~~~~
    + CategoryInfo          : InvalidOperation: (System.Net.HttpWebRequest:HttpWebRequest) [Invoke-WebRequest], WebException
    + FullyQualifiedErrorId : WebCmdletWebResponseException,Microsoft.PowerShell.Commands.InvokeWebRequestCommand

PS C:\Users\shane>
Cool, but let’s get it to return something useful. We will create a basic nginx server and expose it with a certificate. Let’s make a values file test.yml
PS C:\Users\shane> kubectl apply -f test.yml
namespace/test created
deployment.apps/test-nginx created
service/test-nginx created
configmap/nginx-index-html created
ingressroute.traefik.containo.us/test-nginx created
PS C:\Users\shane>
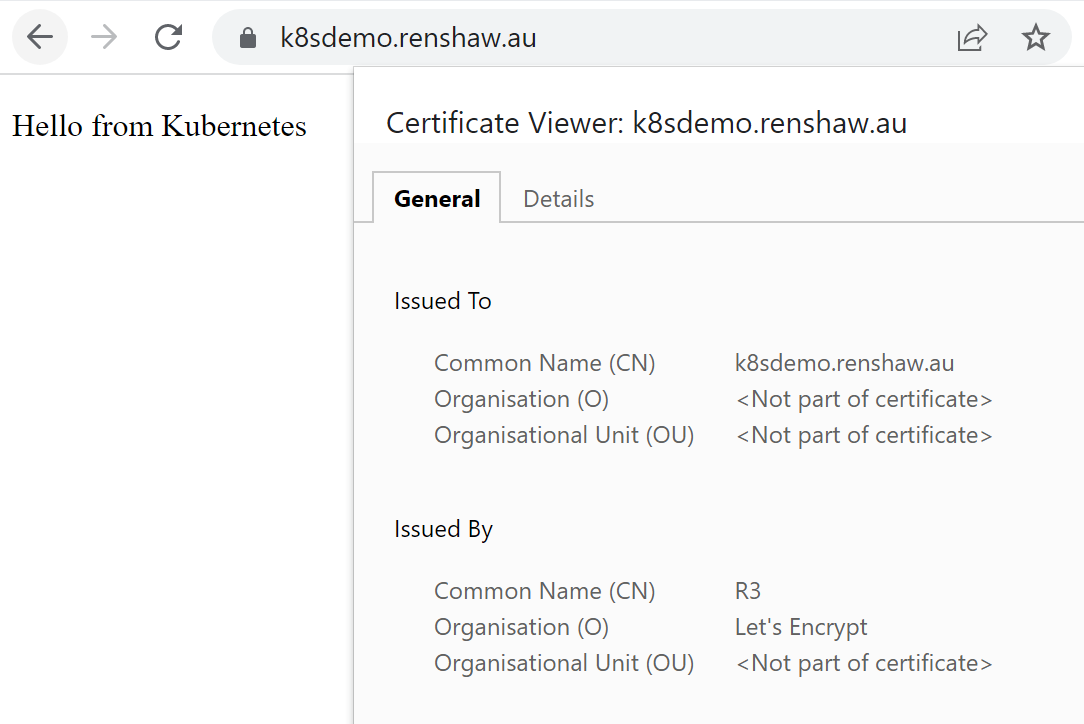
If we now add a DNS entry pointing at our traefik ingress
Test DNS Entry
We can access our website and be presented with a valid certificate.
Test Site with certificate